Monday, November 29, 2010

Studio Mini Makeover

Update from the Studio
Mini Makeover and Fabulous Garage Sale Finds!! :)

Between last week and this weekend I've been lucky enough to stumble upon some amazing finds at even better prices to help give my studio a little update! :)  I wasn't a huge fan of the black wire racks in this room but they did their job, I'm in favor of most things being hidden away from the curious fingers of my toddler!

Remember how this wall looked before? SEE 
Don't worry I am still have all my wine crates for storage, they are being well loved and used. ;)  I came across a garage sale from the sweetest older woman who quilts for a hobby. She was selling this hutch that she owned for several years but it never made its way out of her garage.

Pretty right? Well, I just about fell over when she opened it to show me what it was!!
A SEWING cabinet with an ELECTRIC lift!!  I was in LOVE!

Its Solid oak and very heavy, has plenty of organization and hidden storage!
Its seriously pretty amazing, I didn't know that things like this even existed! I cleaned it up, and spray painted the handles a dark metallic bronze, they were a brassy gold before... much better now. She told me the electric lift didn't work, but to my surpise I plugged it in at home and UP came my sewing machine from the bottom storage rack.
Yes, I admit I have childishly joyfully played with the lever.... up... down.... up... down... happy dance!! lol... 
I researched it online and found nothing else like it except for one, a long lost twin seperated at birth perhaps. ;) A super sweet crafty fellow blogger from Quixotic Crafter, she shared some info about with me her sewing cabinet hutch as well.

Well next I met a neighbor of mine that was having a garage sale, but decided it was to cold... so they would just give the items left away for free! Arizona doesn't really get that cold, but it has been chilly this week.  But heck, my gain! He was dragging this cool looking stainless steel workbench table to the curb as I pulled up.

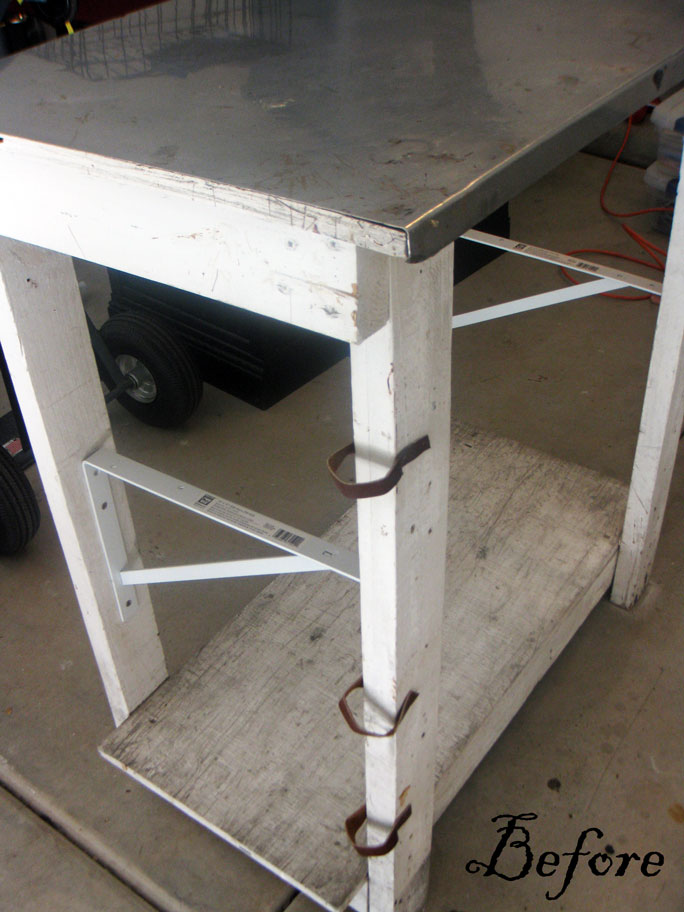
He told me he & his father were shoe cobblers years ago... and this was the last piece left from their shop. It needed some love, but with the stainless steel top, leather straps and height it made for the perfect art worktable for my studio! I'm not a fan of an easel, I'd usually rather lean my canvas against the wall from the table top to paint (see the fabric covered cork board to protect my wall from paint). And spread my paints & brushes all over the table.  I cleaned this cobblers table up and painted it a pretty aqua for my studio... I left the leather straps, they are perfect for large brushes!


It was a great week, I have much to be thankful for... including how God always provides even down to the smallest details! :)

Now, time to get painting & sewing... I will be adding some new items to the Etsy shop soon! 
Heather ~ 

Friday, November 26, 2010

SALE - Black Friday


A little "Thank you"!
I'm having a black friday sale in my LuvARoo etsy shop this weekend, so head on over and save 20% on everything!
Use the coupon code: BLACKFRIDAY
I ended up heading out to a couple stores this morning at 8am, tried to get a firepit from Target for $29... but they sold out first thing... (while I was happily sleeping in bed.. lol...) So I found another firepit at WallyWorld (full price, but it was well worth the sleep), and bought cozy slippers for the kids! None of it was on sale... lol.. I think I'm the worlds worst black friday deal finder.  Regardless, we are looking forward to family cozy firepit time tonight! :) Now I gotta go get some marshmellows.....  Enjoy your weekend & turkey hangover! ;)

Wednesday, November 24, 2010

Pumpkin Placecards and Frame Decor

Happy Holidays!!
We are getting in a festive mood over here, and are excited to host Thanksgiving at our house tomorrow! Lots of last minute decorating and cleaning, and of course listening to Christmas music! ;)

This year I wanted to add a little more pop to the tables setting and painted some mini pumpkins in place of name place cards. Each little pumpkin has a name on top and is painted in tones of Gold/Silver and Bronze paired with orange. So fun & festive!!
Each pumkin will be placed on a plate with alternating gold & silver chargers. I left a blank spot on the front of each pumpkin and picked up some black sharpies... so each family member can fill in a word of something they are thankful for! A fun take home reminder to be thankful for the little things, family and fun times together. :)


Decorating is simple yet classy this year... I filled up my apothecary jars with things like whole walnuts, tiny pinecones and candy!


I have already have a few Christmas decorations up... I found several big empty frames at yard sales a while back and found the perfect use for them this holiday season.
Old Empty frames make a charming way to display wreaths, ornaments, christmas cards... etc.


A HUGE empty frame on my wall (waiting patiently for me to paint a picture to go inside) was the perfect place to hang a large wintery wreath.  


Sadly we don't have a fireplace so a bookshelf above our entertainment center is my "faux mantle".. lol..  I think I seriously may have gone overboard with frames, but I couldn't get enough of the simplicity & charm they provide.

I hung these sparkly pinecones and icicles from this one, added my sweater candles and a little sparkly Christmas tree. Reminds me of looking out an old barn window to see the snow falling. Lots of memories of snowy Christmas time with my family in Michigan growing up!

Meet our adorable little Charlie Brown tree.... lol.. This cutie is for the kids. We thought a live tree would be fun this year, and something fun to plant after the season is over.  I found the greatest little wooden top ornaments and bells for this tiny tree. The kids love it because it's a perfect height for them... and every time they shake it a bell rings... and an angel gets its wings. ;)


Well, Happy Holidays from my family to yours.... and a big sloppy wet nose kiss too!  LOL....
Have a wonderful Thanksgiving and don't get trampled in black friday sales.... I think I already decided I'm gonna spend my morning snuggled up in bed. No crazy shopping for me this year, just relaxing... well maybe a little online shopping! Gotta support my UPS man! ;)


~~ Heather ~


Monday, November 22, 2010

1st Birthday Tutu Sets

1st Birthday Yummy Tutu Sets!

I had some extra tulle in my fabric stash from a couple friends baby girl birthday tutu's I made the a little while back... so I thought I'd make a couple to share!  These are a one of a kind and ready to go home. ;)

~Sweet Cupcake Set~
Includes bright pink super fluffy Tutu, cupcake rhinestone embellished onezie, complete with a cherry on top headband! lol... Seriously it's almost good enough to eat! ;)  


Available: Here

~Pink Cheetah Ruffles~
This one is for your baby diva, soft pink & black cheetah ruffles and loads of tulle!
All size 12 mo, tutus will last much longer because they are made on a elastic band.
I enjoyed the embellishing this onezie... I think I may have to make some mommy size ones like this! So fun & artsy chic!

Available HERE

Happy first b-day to my girlfriends daughter sweet baby "K"! I made this tutu for her and couldn't get over how freakin cute she was walking around with that big puff ball of tulle! Baby girls are so fun to play dress up with! -- Anyways, get your tutu b-day set for your lil doll! I probably won't be making any more of these, so get em before they are gone! ;) 
I'm so behind on getting some new posts up on the blog, there is so much fun stuff to come!
Stick with me!! :)
<3 - Heather

Sunday, November 14, 2010

Craft Show Fun with Pics!

Craft Show Boutique Pics!! :)
We had a great time, thank you so much to all our friends & family that stopped by to share in the fun.
Together Laura & I had a super colorful table with a variety of goodies for sale. We were one of the few booths there with all handmade goods and had a completly unique look from the rest of the booths.
(Sorry for the foggy pics, I didn't realize that my toddler had planted a nice sticky fingerprint on my camera lens! lol)

My lovely sister! Check out her etsy shop at:

She has many fun unique ideas, including super cool lightswitch covers in a variety of patterns, jewelry, baby blankets, and pillows!

Together we made loads of Hair accessories which almost completly sold out the first day!
She sold beautiful jewelry and my winter embellished beanies, and aprons were a huge hit too!

I made a few tiny 1st Birthday tutu sets , - look for these in my etsy shop soon! 


Lightswitch covers, loads of pillows and blankets and Luv-ies (burp cloths)!
It was exausting but super fun! Note to self: never attempt to wear high heels of any kind for that many hours a day... we had no place for chairs and spent both days on our feet. Thank goodness for a celebratory glass of wine & bubble bath!  

Now on to rebuilding inventory!  :)
Lots of Love!!
~ Heather  

Wednesday, November 10, 2010

Refine Boutique

I am so excited to be a part of my first craft show/boutique!
I hope my local Arizona friends come check out the "Refine Boutique"
Where fine things meet fellowship!

Come say Hi, shop around, sit by the pool, enjoy a cup of soup, a cup of cider or coffee and enjoy the live music. :) There will also be a fun raffle, be there for a chance to win some amazing things from over 22 vendors!

The dates and times are as follows:

Friday, November 12, 5:00-9:00
Live music by the pool from 7-9  and there will be soup for sale along with coffee and hot cider.

Saturday, November 13, 9:00-12:00
With Live music by the pool all morning along with coffee and cider for sale.

Located at the Agritopia Clubhouse, in the sub-division of Agritopia, which is north of Ray, between Greenfield and Higley in Gilbert.  Shoot me an e-mail or call if you need further directions!

My sister & I are hosting a table together with a VARIETY of fun items for sale at great prices!
Check out her etsy website Laura's Lovleys. Here's just a taste of the items we will have available, ranging from: Purses, Artwork, Baby blankets, Burp Cloths, LuvARoo baby carrier wraps, 1st Birthday Tutu sets, Lightswitch Covers, Jewelry, Throw Pillows, Hair Accessories, Hats.... and much more!!!


Friday, November 5, 2010

Love Notes and a Special Date


Love Notes...
I married the love of my life almost 10 years ago!
I love this man, life is so much fun and better together. Can't believe we have been married for nearly 8 years, it's amazing how quickly its passed. Yet when I look back, through all we have been through; 3 children, homes, places we've visited... pets we've owned... lol..  It feels like we have always been together.

So with our special date quickly approaching I've been feeling nostalgic and romantic.  I went though a box of some of the love letters we wrote to eachother over the years, and felt inspired to create something fun and meaningful for our anniversary.

I had seen tutorial from AlisaBurke blog, about making love notes into pillows! Loved this idea... so here is my version of the Love Note throw pillows. What a beautiful reminder everyday of our love!


All my love, All the time... is a phrase we started when dating and had fallen head over heals in love. :) He had this saying engraved onto a silver jewelry box for me as a christmas gift before we were engaged. I treasure it and still love our little quote.

How to make your own love note pillows?
Scan in your lovenotes, song, or whatever is meaningful to you. I edited them in photoshop, enlarged and increased the contrast of the letters, you can also give it a sepia effect. Then simply print onto an iron on transfer paper! Be SURE to Mirror your image before you print!!! I've forgotten this many times...

Then follow your transfer papers ironing directions. I used a natural colored linen for my love notes and a pretty linen floral for the rest of the pillow. The colors and flowers reminded me of our wedding day!
  

Sew your love note to the front material of your pillow, I like the exposed edges.. they will fray slightly over time. However you could fold your edges in for a crisp look. Then sew your pillow together right sides facing eachother, leave a 4 inch opening on the bottom to turn right side out, stuff your pretty new pillows and handstich the opening closed. I love pillows, my hubby laughs at our throw pillow collection for the bed... but maybe he will enjoy these sweet reminders of All my love, All the time... ;)

I'm looking forward to this weekend... a four day weekend for us! Time to just to enjoy being together and celebrate 8 years and many more to come!